
I guess it’s fitting that my 300th post features the most New Yorky of cookies; the Black and White cookie.
Much of this blog has focused on my living in New York: balancing random jobs as a performer, writer and baker; dragging standing mixers to the apartments of boyfriends past; working for a local gluten-free magazine or meeting famous chefs; and eventually refocusing my work to bake less and write more. Yes, these cookies are not an adaptation of a chef that I know or am working with, but they are quintessentially New York.
And insanely delicious.
Honestly, until making them I’d never actually had a Black and White cookie. Or, if I have, the memory eludes me. But I’ve seen people devouring them over the years, and one my favorite editors at one of the sites I write for spells out the good and the ugly of this little classic. I knew that they don’t last long – they’re basically cake and a thin layer of icing, after all – and that anything covered in a powdered sugar glaze means that nothing but sweetness threatens to dominate.
But still, I had to make them. Of course.
What I discovered is that, if made with just the right touch of lemon and some good cocoa powder, they’re quite delightful. Yes, my first few goes at them were somewhat frustrating; what worked well one day didn’t the next, and it wasn’t until a friend brought some old-school ones to my holiday party that I realized you ice the flat side rather than the domed one, as I had been doing. But once I got the hang of them, they accidentally became a favorite to make. Yes, it takes a while to smoothly ice both colors, continually thinning and thickening the glaze, but this is one of those recipes that begs the baker to slow down, concentrate, and not take it all too seriously. Icing can be soothing, if we just let it be.
Despite the accidental excitement of going to type this recipe in and realizing it’s my 300th post, I don’t have much more of an ode or love song to New York to add. 300 recipes has definitely made me a better gluten-free baker — a friend who recently tried four different cookies I made for my cookie and cocktail party remarked that my skills have dramatically increased over the years that he’s known me — and they’ve taught me to both be precise and patient as well as not take everything so damned seriously.
So just know that this little classic New York cookie recipe comes for a very typical New York City home; one of a small kitchen crammed with equipment, one with only enough light to let a gal take photographs within a three-hour window, one where you sleep only feet away from where you work, and one that’s friendlier and warmer than many non-New Yorkers might assume.
“Let’s Hear It For New York… New York… New York….”
– Jacqueline
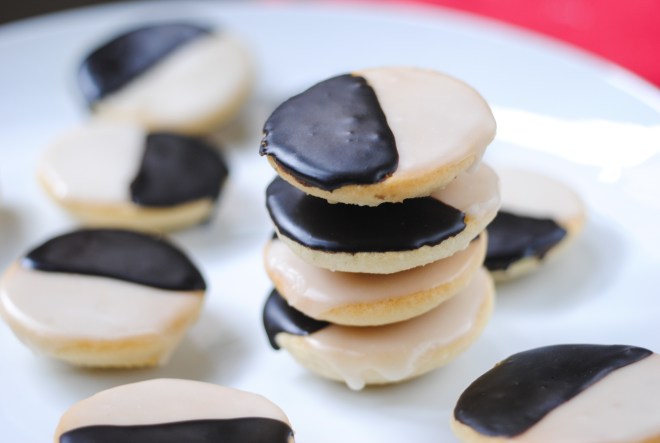
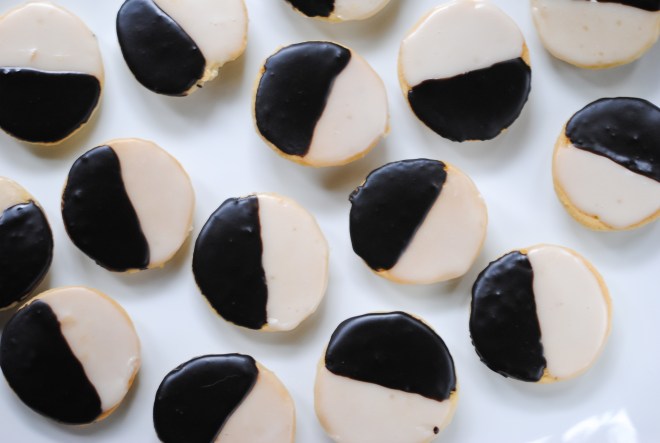
{gluten-free} Mini Black and White Cookies
Notes on the recipe:
Treat the cookie base like a cake recipe; make sure your cookie sheets are heavy ones, make sure your eggs and milk are not cold out of the fridge, and only fold in the flour ingredients until the batter comes together. If not, you risk cookies that fall flat and bake unevenly. Because these bake quickly, I usually just bake them off one sheet at a time. If you do two, rotate them halfway in between, but do so quickly, so that the heat doesn’t escape the oven and the cookies don’t risk falling flat.
I can have butter but nothing above, so I use non-dairy milk instead of regular milk. If you have no milk issues, you can use 1/3 cup of buttermilk and omit the lemon juice, or use a non-dairy milk of choice; the lemon juice both sours the milk to make it taste like buttermilk, and helps the gluten-free flours, starch and gum work together.
You want the glaze to be just right – not particularly runny, but not so thick that it doesn’t settle smoothly. Add more water, sugar or cocoa powder as needed and just use your spatula to let you know when it’s right.
Ingredients:
- 3/4 cup brown rice flour
- 1/4 cup millet flour
- 1/4 cup tapioca starch
- 1/8 teaspoon xanthan gum
- 1/2 teaspoon baking soda
- 1/2 teaspoon kosher salt, plus another pinch for frosting
- 6 Tbsp unsalted butter, soft
- 1/2 cup sugar
- 1 large egg
- 1/3 cup milk (or dairy-free milk of choice – I used both unsweetened almond and unsweetened coconut milk with success)
- 4 tsp lemon juice, divided
- 2 tsp vanilla extract, divided
- 1 1/2 cup powdered sugar
- 2 Tbsp corn syrup
- 6-8 Tbsp cocoa powder
Preheat oven to 350°F.
Line 3 cookie sheets with parchment or Silpat.
Toss the flours, starch, gum, baking soda and salt together in a small bowl, and set aside.
Combine the milk, 2 tsp of lemon juice and 1 tsp vanilla in a measuring cup.
In the bowl of a standing mixer with the whisk attachment (or in a large bowl with a hand mixer), cream together the butter and sugar for about 1 minute on high speed. Scrape the sides of the bowl, add the egg, and cream on medium high for about three minutes, until pale and somewhat fluffy.
Staring with the dry ingredients and alternating the dry ingredients and the wet, add one at a time, mixing on medium speed until just incorporated and scraping down the sides of the bowl between additions, adding the dry ingredients in three additions and the wet in two. Mix until the dough is just fully incorporated.
Drop in scant tablespoons onto the cookies sheets, 12 cookies to a sheet.
Bake for 6-8 minutes, until the domes are just firm to the touch (if baking two sheets at a time, rotate them halfway through baking).
Cool the cookies completely before frosting.
For the frosting:
In a small bowl, whisk together the powdered sugar, 1tablespoon corn syrup, 2 remaining teaspoons of lemon juice, remaining teaspoon of vanilla, and a pinch of salt. Add water – one teaspoon at a time – until it becomes a spreadable but not runny consistency.
Ice 1/2 of the flat side of the cookie, placing on a cool cookie sheet to dry as you work.
When all the vanilla side is done, whisk in 6 tablespoons cocoa powder and the final tablespoons of corn syrup. Slowly add water, whisking in until it reaches the desired consistency again.
Ice the remaining halves of the cookies, adding additional cocoa powder or water as you go to keep the consistency right (depending on your speed and the heat/humidity of the kitchen, it may dry out or thin out).
Allow to set completely before serving, and eat within two days!


I love the black and white! These look tasty!
Congratulations on your 300th post! I’m definitely going to bake these elegant black & white cookies for the next event. Thank you very much for the recipe!
Congratulations, this is such an amazing achievement! I love your blog, I just got to discover it and it is so lovely! <3