Tag Archives: cinnamon

Gluten-Free, Milk-Free Gingerbread

Gluten-Free, Milk-Free Gingerbread

Years ago I inherited a gingerbread recipe that sent my taste-buds flying.  It was a dear friend’s mom’s, and I remember the first time I made it for a group of friends.  Back then, I was relatively unfamiliar with basic cake techniques, and the idea of “starting and ending with dry” seemed practically scientific.

The cake got raves.  But after that first time, I couldn’t eat it.  My milk allergies had gotten worse.

Fast forward ten years later and I made the recipe my own.  I think actual ginger-bread is too often overlooked in favor of its cookie-d cousins.  Which, trust me, I enjoy thoroughly.  But there’s something so homey and warm and New England holiday about it that I particularly love.

Substitution ingredients are below, but this blend of ingredients produced a moist, perfectly sweet, highly-spiced cake that I ate way too much of as soon as it was cool enough to slice.

Notes: I used butter, but not milk, substituting with unsweetened almond milk.  To make completely dairy-free, substitute the melted butter with melted butter-flavored Earth Balance.  You can use regular all-purpose flour (2 cups) if you don’t have gluten problems, or substitute with a gluten-free mix of your own.  I use less xanthan gum in this recipe than you might expect – if you want to omit completely, just add 1 Tbsp of flax meal. 

Another time I made this recipe I used 1 cup white rice, 1/2 cup tapioca, 1/2 cup sorghum and 1/4 cup millet and it worked well too!

Top with unsweetened coconut milk whipped cream for a special holiday treat!

Ingredients

  • 1 cup white rice flour
  • 1/2 cup quinoa flour
  • 1/2 cup gluten-free oat flour
  • 1/4 cup tapioca starch / flour (or arrowroot starch)
  • 1 teaspoon salt
  • 1/2 teaspoon baking powder
  • 1 teaspoon baking soda
  • 1 teaspoon xanthan gum
  • 1 teaspoon cinnamon
  • 2 teaspoons ground ginger
  • 1/2 teaspoon ground cloves
  • 1/2 cup melted butter (or melted Earth Balance to make dairy-free)
  • 1 cup molasses
  • 1 egg, at room temperature
  • 1 teaspoon vinegar and enough unsweetened almond, soy or cow’s milk to make 1/2 cup of liquid total
  • 1/3 cup maple syrup
  • 1/4 cup hot water

Directions

  • Preheat oven to 350 degrees F.  Grease and flour an 8-inch square baking pan (preferably something thick like a Pyrex dish), set aside.
  • In a measuring cup, heat the milk and vinegar so that it’s slightly warm.
  • In a large bowl (or the bowl of a standing mixer fitted with a paddle attachment), add flours, tapioca starch, salt, baking powder, baking soda, xantham gum and spices.  Stir/mix/whisk quickly to combine.
  • Make a well in the center and pour in this order: molasses, maple syrup, melted butter, egg, and milk/vinegar mixture.
  • Stir/mix together until combined.
  • Add hot water and beat until combined.
  • Pour into pan and bake for 40 minutes or until slightly browned on top and slightly springy when you press it with your finger.
  • Cool for 15 minutes, then loosen from the pan with a knife and invert onto cooling rack.
  • Cool completely before slicing.

Decorate with sifted powdered sugar and whipped cream (either cow cream or coconut milk are delish!)

Dairy-free Molasses Cookie Coffee Ice Cream Pie! A Recipe Swap!

Coconut Milk Coffee Ice Cream in a Molasses Cookie Crust

Did I stay in nights this weekend to make cookies and coffee ice cream?  Yes, yes I did, and I’m not ashamed to admit it.  Nor am I ashamed to admit that I ate the piece of ice cream pie in the photo above as I started typing this entry – at 11am on a Sunday morning.  And another one later at night while watching True Blood.

I have no shame because this dessert – coconut milk coffee ice cream in a molasses cookie crust – is one of the most insanely delicious things I’ve ever made.  And it happens to be gluten-free, dairy-free  and sweetened only with date sugar, molasses, maple syrup and honey.

Other than watching movies and walking miles on end, this weekend was devoted to a BURWELL GENERAL STORE VINTAGE RECIPE SWAP!  Yep, it’s that time again, when a group of twenty or so bloggers get sent an old recipe that we each have to adapt, changing at least 3 things about the ingredients or process.  This month is an already gluten-free molasses cookie!
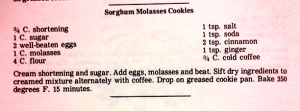
Please check out the other swappers!!  It’s always incredible to see how a talented group of inspiring chefs take one idea and run with it.  Details and links are below the recipe.

So, I actually didn’t really want to alter much of the recipe, as it looked simple and delicious.  I just changed the combination of flour and used date sugar instead of white sugar and a little maple syrup, bourbon vanilla and cocoa powder to add even more depth. 

The result?  These cookies taste incredible!  Soft, almost cake-like, and you can taste everything in them: the molasses, cocoa, vanilla, maple syrup and coffee.

But my version looked horrible.  Puffy, no spreading, rough.  I told my roommate they too closely resembled deer turds.  So I needed to take them a step further.  What to do with delicious but ugly cookies?

PIE CRUST!! And what better to put into the pie crust than coffee ice cream?!?!

So I followed the recipe in Simply Gluten and Sugar Free, using honey as a sweetener and maple syrup instead of Stevia.  An overnight chill and 20 minutes in my ice cream maker, and voila! One of the best desserts I’ve ever made and a new favorite.

I’ve been chomping down too many of these cookies this weekend.  And ate that pie with a huge pot of tea made with leaves my friend Jonathan gave to me from a monastery in China.  It think it’s time to get my Physique 57 on and then walk the 8 miles to my yoga studio.  So while I go do that, I leave you…

Coconut Milk Coffee Ice Cream Pie!

Coconut Milk Coffee Ice Cream Pie

Ingredients:

  • 1 cup coconut flour
  • 1 1/2 cup brown rice flour
  • 1 cup sticky / sweet rice flour
  • 1/2 cup arrowroot starch
  • 2 tsp xanthan gum
  • 1 tsp kosher salt
  • 1 tsp baking powder
  • 1/2 tsp baking soda
  • 2 tsp cinnamon
  • 1 tsp ground ginger
  • 2 Tbsp unsweetened cocoa powder
  • 3/4 cup shortening
  • 3/4 cup palm or date sugar
  • 2 eggs, thoroughly beaten
  • 1 cup dark molasses
  • 3/4 cup coffee, cold
  • 1 tsp bourbon vanilla extract

Directions:

  • Preheat oven to 350°.  Butter or grease thick baking sheets.
  • Sift together all dry ingredients in medium bowl.
  • In the bowl of a standing mixer with the whisk attachment or with a hand mixer, cream the shortening and sugar until smooth and fluffy.
  • Add the eggs and molasses and beat to combine.
  • Add the vanilla to the coffee, then add dry ingredients alternatively with the coffee, starting and ending with dry.
  • Drop in tablespoons onto sheets, flatten, and bake for about 15 minutes or until slightly soft.

To make into an ice-cream pie, simply crush about 16 of the cookies in a food processor and press into a shallow pie plate.  Place in the freezer to harden while you either process your ice cream or melt some store-bought ice cream to pour in.  I made and LOVED the recipe posted on Simply Gluten and Sugar Free.

Recipe Swappers
Lindsay is a gem with honesty and simplicity written into her recipes. She loves Oregon, its ingredients and Portland’s lifestyle, and it shows.
Chef Dennis. A veteran chef in his own right, we are lucky to have his Italian Lemon Pear Cae contribution to the swap.  The rest of his fantastic food blog can be seen at morethanamountfull.
Mari lives in Oregon wine country and is a budding wine connoisseur.  I fell in love with her use of Pinot Gris in the glaze for her (gluten-free!) Lemon Cake swap, which was her inaugural recipe with us. Visit her at The Unexpected Harvest.
Boulder Locavore’s  starting point for the recipe swap is always a local-seasonal-organic combination, though her love of international cuisine and cocktails often work their way into the mix!
Joy, holding down a dairy-intolerant household, doesn’t let that restrict her love of flavors and food, in fact, I think it inspires her to do what she does. When you visit her blog, be sure to check out her “ubiquitous about page” and the balcony gardening category.
Monique has been food blogging since 2007, her Fat and Happy blog is about food, recipes, cooking, baking, drinking, eating and friends! As the former owner of the Monkey Bean Cafe and Bistro, she still loves to create recipes from scratch. If you send her an unusual ingredient, she’ll create a recipe for you!
Shari Good Food Week is almost like my diary as I search for a house, plan the perfect veggie patch, stumble through farmer’s markets with my eye half open (because you need to be there at 6am to get the fresh eggs), gather family and friends around a shared table, laugh out loud and enjoy life to the fullest! Blogging from Canberra, Australia, I hope to bring a different perspective to the Recipe Swap.
Priya is also joining us from Australia. She’s a vegan who loves baking, cooking and eating, having chosen the lifestyle after being a vegetarian most of her life. She caters hand-crafted vegan and vegetarian food, and also delivers hand-crafted  vegan and vegetarian cookies and cupcakes.
Jennifer‘s tag line says it all: Life is too short to eat bad food.  At her blog, Adventuresome Kitchen, you will find a passionate food-type, feeding her family amazing meals and living to blog about it. Jennifer joined in at Grandma’s Chicken Pie and Drop Biscuits.
The Cake Duchess.  The name says it all, and Lora’s recipes are rock solid, creative, decadent, inspiring. What other adjectives can I throw at her?  Her innaugural recipe was Grandma’s Chicken Pie and Drop Biscuits, a rare savory recipe for her to develop.
Pola is a new blogger from Italy, transplanted to the cold Midwestern plains. After years of calling mom to check on cooking times and temperatures of family Italian recipes, she started writing them down. In the process, she is hoping to help new friends discover how to cook simple and authentic Italian food.
Mary is a lifelong resident of the San Francisco Peninsula and was diagnosed with Celiac Disease in 2007. Her search for a gluten-free chocolate chip cookie that didn’t taste, look or feel gluten-free inspired her blog and she’s been happily baking ever since.
Jamie blogs at Random Acts of Food and has a love for food that only an Italian could! She enjoys cooking and baking in all cuisines for her family and friends.  Originally from Long Island, Jamie now resides in Boston with her amazing fiance.
Crissy and Lauren are two So Cal natives and recent college graduates who are embracing their passion for all things culinary in their Little Yellow Kitchen. They blog at From The Little Yellow Kitchen about maintaining a balanced diet of equal parts healthy, savory, and sweet.  From a zesty Chocolate Mojito Key Lime Pie to a nutritional Rosemary Parmesan Kale Chip snack, this kitchen has it all.
Claire blogs with Texas pride from Dallas. She loves chicken fingers, Law and Order SVU and is left handed. We are excited to have her!
Sabrina Modelle  is the girl behind The Tomato Tart, a blog about the unadulterated love of food and cooking. Farmers markets, ethnic groceries, high-end restaurants and tiny taquerias all provide inspiration for the Northern California native who was raised in a French family with food at the center of life. From rich chocolate cakes to vegan curries, the Tomato Tart is full of flavor both figuratively and literally and like food, best enjoyed with a nice glass of wine.
Nicolle writes the joyful Rhythm of the Seasons from Boulder, Colorado and is looking forward to offering more recipes and menus as the spring, summer and harvest seasons heat up.
Linda is an award-winning journalist, food writer and nutritionist and Founder/Editor/Publisher of EENews, for sustainable food and sustainable life. She has written 20 cookbooks that have garnered prizes including the James Beard for one she wrote with her daughter, Katherine West DeFoyd, entitled Entertaining 101, Doubleday. Their follow-up book, Stylish One Dish Dinners, Doubleday, was also nominated for a James Beard prize. Her ground-breaking book, Bread in Half The Time, Broadway Books, was named the Best Cookbook in America by the prestigious IACP, The Julia Child Award.

Jaclyn is a writer, baker, perpetual daydreamer and the author of the cooking and baking blog Food+Words. She has a degree in Creative Writing and is currently studying Baking and Pastry at Le Cordon Bleu. Jaclyn loves poring through old cookbooks she inherited from her grandmother and reinterpreting those recipes with modern, updated twists. Jaclyn has a panchant for baking, laughter, a nice glass of Riesling and anything lemony.
Alli is a research nutritionist by day, transforming into a creative cook by night. She lives in Seattle and scours through her piles of cookbooks, magazines and restaurant experiences for easy ways to transform recipes into healthy and flavorful dishes.
Rachel Saunders is the owner of Blue Chair Fruit and author of The Blue Chair Jam Cookbook. She produces all of her jams and teaches classes from her space in Oakland, California.
Lana is a native of Serbia, who has finally found her home in Southern California, after living for ten years in Michigan and ten years in Ohio. She is mother of three girls and wife to a token household male. her blog is a place where the love for words meets the love for food, a place where family and friends, old and new, gather around the virtual kitchen to reminisce, laugh and cry.
Emily thinks that no matter what it is, all foods taste better when made with love. From growing up in North Carolina with a Palestinian father with a passion for food and an American mother who really did not, to being the holiday sous chef to her real-chef brother, to moving to Brooklyn, the love of a good meal pumps through her veins. From her CSA to nostalgic junk food cravings, from the food truck to the fine dining scene, kitchen inspiration is around every corner.
Alex: I live in Seattle and while I have a typical desk job, my heart is in my home, baking, cooking and eating! I love reading about what other people are creating, so I decided to share my own creations. My blog is about food, but also things that I generally love in life. Since I love eating, I also have a huge love of fitness…so I can eat more!
Shumaila:  After I got married in March, 2010, and shifter to a town where take-aways and restaurants are next to none, I started cooking for the first time in my life. I have always loved baking, but cooking to me was completely new. I started experimenting with recipes for my husband and myself and found blogging the perfect way to keep track of things in the kitchen and also a way to document my first year of marriage. Being Indian, I also started a weekly blog posting “Garam Masala Tuesdays” to try, to the best of my knowledge, to explain the Indian recipes I try at home. I blog from Arizona, USA.

Gluten-Free Ebelskivers

Gluten-free Ebelskivers!

For some reason listening to Nina Simone seemed appropriate when making Ebelskivers alone in my apartment last week.  Being that Nina is neither from Denmark nor filled with jam, I don’t know why this was so.  Maybe sweet cinnamon, sugar and molasses made me think both of the blues and pancakes??  Or strong coffee and whiskey?  Mine is not to reason why… just to bake and sway slowly and enjoy.  Which I did.

My friend Abigail loaned me her cast-iron pan for these little treats recently, and I had a feeling “waiting” for a brunch crowd was going to test my patience too far. So these got simply rolled in cinnamon and sugar and were served atop whipped cream with chocolate macaron shells, hazelnut cookies and cherry compote at a dinner party I attended later in the evening.  I should have taken pictures of the whole caboodle, but let’s just say a few bottles of Prosecco had made their way around the room by the time dessert was plated.

Abigail also gave me her recipe, which is a basic pancake recipe but where the smart (and culinary-school trained) lady specifies separating the egg whites and yolks and beats the whites to stiff peaks, giving the pancakes a lot more lift and chew.

I simply adapted by using my gluten-free cake flour blend and changed / added a bit here and there. And I learned from a few floppy results how to get the pancakes as round and fluffy as possible!

Ingredients

  • 1 3/4 cup gluten-free flour (I used my standard cake flour blend)
  • 1/2 tsp xanthan gum
  • 1 tsp baking soda
  • 1 tsp baking powder
  • 1/2 tsp salt
  • 1 1/2 Tbsp granulated sugar
  • 3 large eggs, separated
  • 1 3/4 cup unsweetened almond milk
  • 1 Tbsp soy sour cream
  • 1 tsp vanilla extract
  • 1/2 tsp ground cinnamon
  • 4 Tbsp melter butter or cooking spray

Directions

  • Sift flour, xanthan gum, baking soda, baking powder, salt and sugar in a large bowl.
  • Lightly whisk the milk and soy sour cream until smooth (this somewhat replicates buttermilk).
  • Add cinnamon and vanilla.
  • Lightly whisk the egg yolks and then whisk into milk mixture.
  • Combine wet with dry.
  • Beat egg whites into stiff peaks and then fold into batter.
  • Melt butter and wipe with a pastry brush into Ebelskiver pan, then set over medium/high heat.  If using cooking spray, spray liberally.
  • Bring to a medium/high heat and fill 3/4 way with batter, making sure to note where you’ve started and ended to make turning easier.
  • Using a miniature frosting spatula, tongs, a 2-pronged fork or miniature spatula, flip Ebelskivers when they are just starting to pull away from the pan and browning on the bottom.  I’ve found confidence and the grace of a ballerina help when turning them without the batter messing all over the pan.  Standing with one foot slightly raised and toes pointed somehow also contributes to success. As does giving yourself an extremely low curtsy afterwards in celebration.

Now, I simply tossed mine in cinnamon and sugar and they were divine.  On a more ambitious day (or when trying to impress an overnight guest who’s daring to stay for brunch) I might put a drop of jam or lemon curd into the center. Ooh, or dark chocolate (for them, not me).

I found the result to be a lovingly fluffy, chewy pancake, rather neutral in flavor as one must be.  Mixing some ground flax seed and diced ginger might be delightful.  Hmm… now I’m hungry.

Round and fluffy and delicious


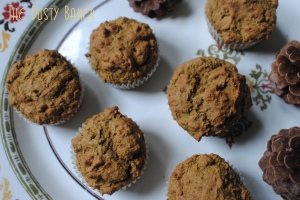
Insanely Healthy Sweet Potato Flax Muffins

Insanely yummy, healthy Sweet Potato Flax Muffins

Yesterday morning I awoke to Autumn, not Spring, dripping its way down my New York City windows.  It was chilly, much more so than I’d want for a May morning. And though I had very little time to get a bunch of stuff done before yet another commute east for rehearsal, I found myself craving something grainy and warm.

And luckily there’s always time for… muffins!I love making muffins because of how easy and versatile they are.  I obviously wasn’t going to go out to get any ingredients, and I didn’t have an apples or rotting bananas on hand.  So I scoured my pantry and found an old can of sweet potato puree left over from my waffle experimentation.

Voila!  Naturally gluten-free, these muffins are chock full of fiber with flax seed meal, have a little boost of protein with quinoa flour and contain no processed white sugar.  You can also easily make them dairy free (directions below).  They’re moist and dense, but not very sweet.  Because of this you can toast one up for breakfast or serve as a dinner “roll”.  If you need them sweeter, I suggest slathering with some jam or dunking in maple syrup or honey.  Butter is also delightful… mmmmmmm…

Yields 12 insanely delicious muffins

Ingredients

  • 1 cup brown rice flour
  • 1/2 cup ground flax meal (not flax seeds)
  • 1/2 cup quinoa flour
  • 1/2 cup arrowroot or potato starch
  • 2 Tbsp tapioca starch
  • 1 tsp xanthan gum
  • 2 tsps baking powder
  • 1 tsp baking soda
  • 1/2 tsp salt
  • 1 1/2 tsp ground cinnamon
  • 1/4 tsp ground nutmeg
  • 1/2 tsp ground ginger
  • 1 egg plus 1 egg yolk
  • 1 cup sweet potato puree
  • 4 Tbsp butter or Earth Balance, melted
  • 1/2 cup unsweetened almond milk, soy or cow’s milk
  • 1/2 cup maple syrup

Directions

  • Preheat oven to 400°.
  • Line 12 muffin tins with liners or spray with cooking spray.
  • In a large bowl, whisk all dry ingredients until thoroughly incorporated.
  • In a smaller bowl, mix eggs, sweet potato puree, maple syrup, butter and milk thoroughly until smooth.
  • Fold the wet ingredients into the dry until just incorporated and a bit lumpy.
  • Fill evenly into tins and smooth with a spoon.
  • Bake for 22-25 minutes or until slightly browned on top.

Yields 12 muffins.

For nutritional info please go to this recipe on CookEatShare.

Yummy, moist and slightly sweet Sweet Potato Flax Muffins

Recipe is loosely based on one by Michelle at TasteAsYouGo.  Please support her blog!

Coriander Cinnamon Carob Candy

Coriander Cinnamon Carob Candy

Rustic.

That’s a word I’ve been throwing around my kitchen lately.  My ambitions with allergy-alternative baking are to make gorgeous treats just as delectable for those without sensitivities as those with, that are as appealing to the eyes as they are to the tastebuds.

But sometimes things just look…rustic.  They taste delicious but look a bit like the ugly duckling pre-swan-age.

This recipe is one such recipe.  I’m playing with molding carob powder with spices and fat into a hard candy that is satisfying and palatable for even the most sensitive stomachs.  Once again, this combination tastes delicious – with citrusy tangs of coriander and a cinnamon spice – but it took a while to get them to release easily from the molds.  Like the little engine, I think I can, I think I can, I think I can… but for now I’ll enjoy my “rustic” treats.

Ingredients

  • 1/2 cup ghee (clarified butter) or unsalted butter
  • 1 1/2 tsp ground decaffinated coffee
  • 1 tsp coriander seeds, crushed
  • 2 Tbsp cinnamon, plus more for dusting
  • 3/4 cup coconut creme
  • 1 cup carob powder

Directions

  • Lightly grease mini-cupcake tins and dust heavily with cinnamon
  • Place a small pot on low heat and melt ghee or butter
  • Add 2 Tbsp cinnamon, coffee and coriander, and whisk to combine
  • Let sit on low heat for about 5 minutes to infuse
  • Slowly whisk in coconut creme, doing so until thoroughly combined and the mixture is a light brown with all the butter absorbed
  • Add carob, 1/4 cup at a time, whisking thoroughly with each addition.  By the second addition, the ghee may separate from the creme and start to lump with the carob: don’t sweat this.  It should absorb back into the final mixture, which should be rather lumpy.  The mixture should not be smooth like chocolate, but almost look like a big pile of used coffee grounds.
  • Use a scant tablespoon to fill each mold, and pat the tops down flat.
  • Heavily dust with two coats of cinnamon.
  • Refrigerate until hard, about 1 hour, then let sit for about five minutes to soften a tad.  Use a very thin knife to work around the mold and slowly ease candies from pan.  Dust with cinnamon.
  • Keep refrigerated until ready to serve.

Sugar-Free Coffee Carob Candies

Coffee Carob Candies

For a few years at the height of my illness, I wasn’t able to eat most things that one would consider an indulgence – chocolate, sugar, alcohol.  While my stomach is stronger and I can moderate some of these things back into my diet, I have a dear friend who still is very limited in what her body can digest.

She hit a pretty big birthday recently, and when I visit her to celebrate I want to present her with something special, indulgent and… digestible.

Carob is a delightful alternative to chocolate – it contains no caffeine, as much vitamin B1 as is in strawberries, and is full of protein, fiber and trace minerals.  It’s gentle on the stomach and naturally sweet, so you don’t need to sweeten it as you do raw cocoa.

So I made a mental list of things my dearie can have and played with proportions.  The result?  A fudgey, chocolate-y treat with a huge blast of coffee and a spicy finish.  An easy, quick way to indulge in a sugar-free treat!

Ingredients:

  • I cup carob powder
  • 1/2 cup ghee
  • 1 Tbsp cinnamon
  • 2 Tbsp ground decaf coffee
  • 3/4 cup full-fat coconut milk plus more if necessary

Directions:

  • Lightly grease mini-cupcake tins or candy tins.
  • In a small pot, melt the ghee, then add coconut milk, whisking continually until warm.
  • Add coffee and cinnamon and whisk to absorb.
  • Slowly add carob, whisking continually, until all the carob powder is smooth.  It won’t have the same consistency as chocolate, being a little thicker, but should be soft and malleable.   If desired, blend with an immersion or standing blender.
  • Press into individual molds and refrigerate until hard, about 1 hour.
  • Loosen candies from pan with a thin knife.
  • Keep refrigerated until ready to serve.
  • Makes about 16 candies.

Baked Blackberry Lemon Crisp Pancake

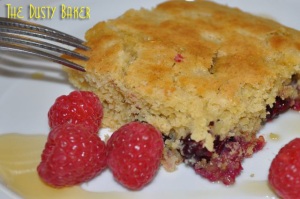
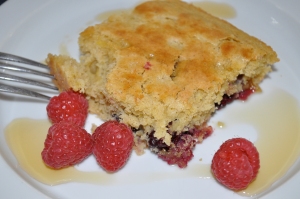
Baked Blackberry and Lemon Crisp Pancake

Last week I posted a recipe on Baked Blackberry and Lemon Pancakes along with a little story about the adorable girls who inspired it.  I thought the pancakes were scrumptious – and considering I ate the entire batch myself over three days, I hope you can trust me on that.

But I wanted a richer lemon taste and an even easier process.  So today, at my father’s house in CT where I don’t quite have my baking arsenal on me, I took on this quest.  And I think I conquered.

The challenge: no alternative sugars, so in this case I did use white sugar – it’s all I had – but there’s still only a trivial amount.  Also, my dad doesn’t have a saucepan that can go from stove to oven, so I opted for a Pyrex baking dish.

I increased the amount of lemon dramatically and added the zest of the lemon itself.  18 minutes in a 400 degree oven and it was good to go – and a triumph!

From the first bite to the last, you get an undercurrent of tangy lemon and the sweetness of blackberries amidst a cornmeal-like pancake.  The drizzled lemon and sugar gives the top a sweet and crunchy crust.  A tiny drizzle of pure maple syrup and you’re good to go with a treat perfect for a Sunday family breakfast or a brunch with your lucky sweetheart.

Prepare:

  • Rinse and dry 1 1/5 cups of blackberries.
  • Preheat oven to 400 degree F.
  • Spray an 8 X 11.5 inch baking pan (I used Pyrex) with non-stick pray or melted butter

In a large bowl mix together:

  • 1 1/2 cups Bob’s Red Mill gluten-free pancake mix
  • zest of one lemon
  • 1 tsp. baking powder
  • 1/2 tsp salt
  • 1/2 tsp cinnamon
  • 2 Tbsp sugar of choice

Whisk together in a small bowl:

  • 2 eggs
  • 1/3 cup lemon juice (I used the juice of the zested lemon and then filled to complete)
  • 4 Tbsp butter, melted and cooled
  • 1/2 cup milk – I used unsweetened vanilla almond milk

Mix in a very small bowl:

  • 2 Tbsp lemon juice
  • 1 Tbsp choice of sugar

Incorporate and bake:

  • Slowly pour the egg/milk mixture into the dry and stir with a spatula to incorporate.
  • Fold in blackberries.
  • Spread batter into pan evenly with spatula, making sure blackberries are dispersed evenly.
  • Bake for 5 minutes.  Then drizzle the lemon/sugar mixture on the top of the pancake and use a knife to swirl into the batter.
  • Bake for another 13 minutes or until the top of the pancake is slightly browned.

This recipe makes enough for 4 people as a main plate or 6 as an partner for eggs or omelets.

Super Bowl Chili

Full disclosure – I have no idea who is in the Super Bowl this year.  I rarely ever know who’s playing. I don’t quite understand football.  I mean, I get it, I understand the rules and all.  But huge men running at each other, the purpose to either knock another down, not get knocked down, or catch a ball without getting piled upon?  Maybe it’s the fact that I’m 5′ 2″.  I can hardly see on top of my fridge.  When I’m around big men I suddenly feel like my neck is really thin.  Just saying.

But, I LOVE the Super Bowl!  Why?  Because it’s the one day a year I make Super Bowl Chili.  Literally, I don’t let myself make it any other time.  It’s a recipe I’ve adapted from a friend, and it’s delicious.  Warm, filling, gluten-free and vegetarian-optional.

I don’t have a picture of it, but you know what chili looks like, right?

Go team.

Ingredients

  • 1/2 cup olive oil
  • 2 lbs. sirloin steak, cubed (to make vegetarian, cube 4 packages of tempeh and follow directions as if cooking steak)
  • 6 cloves of garlic, chopped
  • 2 green zucchini, chopped
  • 1 red bell pepper, chopped
  • 1 orange or yellow bell pepper, chopped
  • 1 large can Italian stewed tomatoes
  • 1 lb plum tomatoes, chopped
  • 1 Tbsp each cumin, basil, paprika, chili powder and oregano
  • 2 tsp black pepper
  • 2 tsp cinnamon
  • 1/2 cup fresh dill, chopped
  • 1/2 cup fresh parsley, chopped
  • 2 tsps salt
  • 1 tsp fennel seeds
  • 1 jalapeno, seeded and chopped
  • 1 can dark kidney beans
  • 1 can dried chickpeas
  • 1 can white beans
  • 2 Tbsp lemon juice
  • Chopped scallions, greens and whites
  • hard bread of choice
  • shredded Manchego cheese

Directions

  • Heat the olive oil in a large (preferably cast iron) pot, add onions and garlic, cook for 4 minutes
  • Add steak and saute till browned on all sides
  • Add zucchini, peppers, tomatoes, all fresh and dried seasonings.  Cook for at least 30 minutes.
  • Add beans and lemon juice.  Cook for another 30 minutes.
  • Keep on low until ready to serve.
  • Serve with chopped scallions, shredded cheese, hard bread or sour cream if desired.

Buck Up with Buckwheat!

It’s cold in New York City.  I sit at the computer, writing away at articles for my job, gobbling hot tea constantly.  And as I puttered around the kitchen this morning, I realized my normal breakfast of eggs and veggies wasn’t gonna cut it. I need something warm, filling and slightly sweet.

Enter BUCKWHEAT.

buckwheat kernals

This gluten-free grain is often overlooked when compared with its massively produced cousin, Oatmeal, but it’s now readily available in health food stores large and small.  It’s not actually a grain, but a seed somewhat related to rhubarb.  It cooks very similarly to oatmeal, though, is as deliciously versatile and is wonderfully filling on mornings when there’s a lot of day to face.  It’s completely gluten-free and a very healthy-happy food.

Healthy-Happy Buckwheat!

  • Completely gluten-free as it’s a seed, so it’s digestible for those with celiac and gluten sensitivities
  • Contains a very high level of magnesium, which relaxes blood vessels and therefore contributes to healthy blood flow and is good for the heart
  • Lowers LDL cholesterol and raises HDL cholesterol (that’s a good thing…)
  • Helps lower and regulate blood-sugar levels by containing chiro-inositol.  Researchers are not sure why this does what it does quite yet, but in humans and animals alike, whole grains containing this compound lowered blood-sugar levels by 12-19% when compared with those given a placebo (check it out at WHFoods)
  • Generally high in antioxidants, so is generally an on-your-side superfood

Let’s Cook It!

Some cook buckwheat as an alternative to rice.  I prefer it as a porridge, all gooey and slightly sweet.  Below is my recipe for a coconut-buckwheat cereal.  Alternatives would be to cook with water or an animal milk, then add any variety of vanilla extract, cinnamon, dried or fresh fruits, carob powder, fresh nutmeg, chai… the list goes on.  I prefer coconut milk on some mornings because it makes the porridge thicker and naturally sweet and creamy.  I pressure cook my morning grains normally, as it adds to the digestion ease and also makes the grains that much more moist and fluffy.  Toasting them for a few minutes on dry heat before adding the liquid increases their digestibility.  Directions for pressure-cooking and stove top cooking are below.

Ingredients

  • 1 cup of buckwheat
  • 2 cups of liquid – I used a can of light coconut milk and then topped off the rest with water
  • 1 tsp maple syrup (per serving)
  • dried cranberries, golden raisins or blueberries (preferably sugar and nitrate-free)
  • raw or toasted nuts (I used pecans, but hazelnuts or almonds would also be delightful)

Directions:

  1. Pressure Cook Grains: Add grains and liquid into a pressure cooker, bring up to full heat (you’ll know because it’ll be sizzling away, making lots of noise and releasing some steam), cook for 12 minutes, then turn off the heat and let pressure release naturally.
  2. Stove-top Cooking Grains:  Toast the grains in a dry pot on medium heat, stirring continually, until they become nutty and fragrant.  Add the liquid, bring to a boil, then cover and reduce heat to a simmer.   Cook about 15-20 minutes until all the liquid is absorbed.
  3. Serve with 1 tsp of maple syrup per serving, and a small handful of raw nuts and dried fruit.

Note: Adding a non-animal protein such as nut-butter or eggs is a great way to make this breakfast a perfect protein and aid digestion.  I actually rarely do such heavy grains first thing in the morning as I can’t digest nuts well in the early day, but as a sweet-treat and with some extra digestive boosting supplements, it’s a great way to face the rain.

How to make this a dessert? Simmer about 2 1/2 cups coconut milk on the stove, adding 4 tablespoons maple syrup, 2+ teaspoons each of vanilla extract and cinnamon and, if you want to live dangerously, a little dark rum.  Add grains and cook on low until thick and sweet.  Whip a whole egg and add in just before the grains are fully cooked, stirring thoroughly.  Taste and add seasonings to your preference.  Remove to a wide pan and refrigerate until cold.  Sprinkle with cinnamon, raisins and (if desired) a little more agave.

Bourbon Molasses Apple Pie (with candied bacon)

Bourbon Molasses Apple Pie with candied bacon

The problem with living in the best city in the world is that you can plan a refined night for you and your significant other of theatre and a late supper at a French restaurant, and then end up going to the theatre, then a rock club, then a blues club, then an Eastern European dive bar until the wee hours of morning, all the while proclaiming “we live in the best city in the world!”

Naturally, sleeping in the following morning was required.  And then the long subway ride home had me maneuvering construction-ed lines, packed by panicked tourists who ripped the bag of groceries I had been schlepping for far too many transfers.

But at least I was going home to PIE.  Apple pie, with molasses and bourbon and a bit of candied bacon on top.  As I was groggily hitting the elevator button, the boyfriend remarked that I had yet to bake him a pie.  As fellow dusty bakers can understand, this was less of a histrionically domestic complaint and more a phrase of endearment that had me humming on my way to the grocery.   My day had taken a turn to the apple world.  It’s a sweet world.

This is the third version of this recipe, lovingly entitled “Punch Yo Mama Kentucky Apple Pie”.  From my time on the border of Kentucky, I learned that those people do well with delicious food and honor their bourbon.

In the last two test versions the molasses flavor held its own but there was virtually no bourbon flavor.  So instead of heating the bourbon and molasses to make a glaze (which I found killed the taste of the alcohol) I blended them at room temperature with a little tapioca starch to thicken the mixture.  I also included bourbon into the pie crust, finding that the flavor works well baked in flours.  Previously I candied thick-cut bacon with a molasses / brown sugar mixture and baked it into the pie – this time candied thinner bacon and sprinkled it on when serving to retain its crunch.

The result?  The bourbon flavor came though just enough that you’d notice but not be overwhelmed by it.  I had added no sugar to the apples, and they came out sweet and caramely, and the cinnamon gave them a bit of punch.  The crust was a bit too crumbly on day one, but definitely didn’t distract, and was soft and manageable on day two.  (For a flawless crust try my Perfect Gluten-Free Pie Crust) By far the apple/molasses/bourbon combination was killer!  And the bacon was so crunchy and sweet that the crusts don’t even need sugar.

Notes: You can use regular white flour in the crust, or experiment with gluten-free flour blends you like using. This crust was a bit crumbly – I’d stick to my easy gluten-free crust or Perfect Gluten-Free Pie Crust, including the bourbon instead of water as suggested below.  If going gluten-free, just make sure you have enough starch and xantham gum to pull the flour together.  You can also use butter-flavored Earth Balance and omit the egg to make this dairy-free and vegan.  I’m experimenting with sugars lately, and used just a tiny bit in this, but it really doesn’t matter what kind of sweetener you use.  Yes, the flavor will vary slightly, but that’s one of the beautiful things about pies: make a crust and fill it with fruit and chances are you’re going to be happy.

Ingredients:

For the filling:

  • 14 small apples, preferably of three varieties
  • 2 Tbsp. bourbon
  • 3 Tbsp. molasses
  • 2 tsp. starch (I used tapioca)
  • 2 tsp. cinnamon (preferably two different, pungent varieties – I used Indonesian and Chinese)
  • Freshly grated nutmeg, about 1/2 tsp.

For the crust:

  • 1 cup white rice flour
  • 1/2 cup amaranth flour
  • 1/2 cup sweet white sorghum flour
  • 1/2 cup tapioca starch
  • 1 1/2 tsp. xantham gum
  • 1/2 tsp. salt
  • 2 Tbsp. sweetener – I used sucanat, crushed cane sugar, because I accidentally picked it up instead of fructose, which I was going to try using.  I’m still working on which sweetener I like best for health / baking reasons.
  • 16 Tbsp. butter, cut into cubes
  • 2 Tbsp. bourbon
  • 4 Tbsp. ice cold water
  • 1 egg, beaten, for brushing on the top of the pie.  You can also use egg white, melted butter or water.

For the Bacon:

  • 5 slices of thin bacon
  • Your choice of sugar – brown sugar or sucanat will flavor best

Directions:

Prepare the Filling:

  1. Preheat the oven to 375 degrees F.
  2. Peel, core and slice apples, and let them sit in a strainer.
  3. In a small bowl, mix molasses, bourbon and starch.  Blend with a fork.
  4. Separate the apples onto two cookie sheets with high rims.  Pour 1/2 of the molasses mixture on each sheet, and mix thoroughly with your hands until the apples are coated.
  5. Sprinkle with each tray with 1/2 of the cinnamon and nutmeg
  6. Bake in the oven for about 15 minutes or until just soft while you prep the crust.

For the crust: I use a standing mixer with the paddle attachment.

  1. Place flours, starch, xantham gum, salt and sugar in the bowl and whisk together.
  2. Toss in butter and start to mix on low speed until the butter is cut in, about 3-5 minutes.
  3. Add the bourbon one tablespoon at a time, and then the water, using only just enough for the dough to pull together.
  4. On a floured pastry board, roll half of the pastry into a disk to fit your pie plate.  I make sure to thoroughly turn and flip my dough so that it doesn’t stick, as gluten free dough can break easily.
  5. Fill the plate with apples, tapping down slightly.
  6. Roll out the top crust, close pie, seal the edges with a fork.
  7. Mix a teaspoon of water with a slightly beaten egg, brush the top of the pie, and sprinkle with sugar if desired (After sampling, the pie was sweet enough without the sugar and would have been prettier if I had omitted it).
  8. Bake for 45 minutes, covering the edges of the pie halfway through to prevent browning, or until top of pie is slightly browned and apples cooked through.

To candy the Bacon:

  1. Heat the oven to 400 degrees F.
  2. Fit roasting rack into a cookie sheet and spray with non-stick cooking spray.
  3. Place sugar of choice in a small bowl, and thoroughly coat bacon with sugar.
  4. Place on cooking rack and sprinkle more sugar on top of each slice.
  5. Cook for five minutes and, if desired, turn bacon and sprinkle with more sugar.
  6. Cook for five more minutes, remove from oven and remove bacon to a plate to cool completely before chopping into small bits.
  7. Sprinkle on top slices of pie for serving.